Home

Showing posts with label DIY. Show all posts

Friday, 1 March 2019

Hippo Hobo Backpack Hack

Hello!

When I recently found myself needing to use crutches, I realized that I didn't have a cute backpack.  I've made plenty of handbags, totes, zipper pouches etc but never a backpack!

I couldn't find a pattern that I really loved, so I decided to hack my Hippo Hobo pattern by Emkie Designs  

Here are the changes I made:

  • I added 10cm (4 inches) to the length of the bag (remember to add to exterior fabric and lining!) and omitted the exterior pockets.
  • I added a top handle, attached between the top flap and back panel so I could hang my backpack.  
  • I added straps, also attached between the top flap and back panel.  I made my straps the length of my fabric width and 10cm wide.  I then sewed a fabric tube and inserted a strip of fleece lining to give it some substance before top stitching the straps to hold it in place.
  • I placed my straps 6 inches apart, but that was just personal preference.
I didn't have any adjustable strap sliders on hand (and wanted to finish my backpack ASAP!) so I knotted my straps to the D-rings, that way they are still adjustable for when one of my daughters want to borrow my backpack.  I would recommend using the adjustable strap sliders!

For my fabrics, I used quilting cotton (which I interfaced) for the main body and rigid denim for the base and accents.  I loved the selvedge edge of the denim, so I used it as a feature on the top handle and the closures.  For the lining of my bag I used a polka dot cotton.  You can see a peak of the lining on the sides this bag, so I cut 5 cm off the top of my lining pieces and added a 5.5 cm piece of the main body fabric.


My rose gold swivel clip is available from WhoSaysSew.com Pretty hardware makes such a difference to your makes!


Happy Sewing!
xox Allison

Monday, 28 May 2018

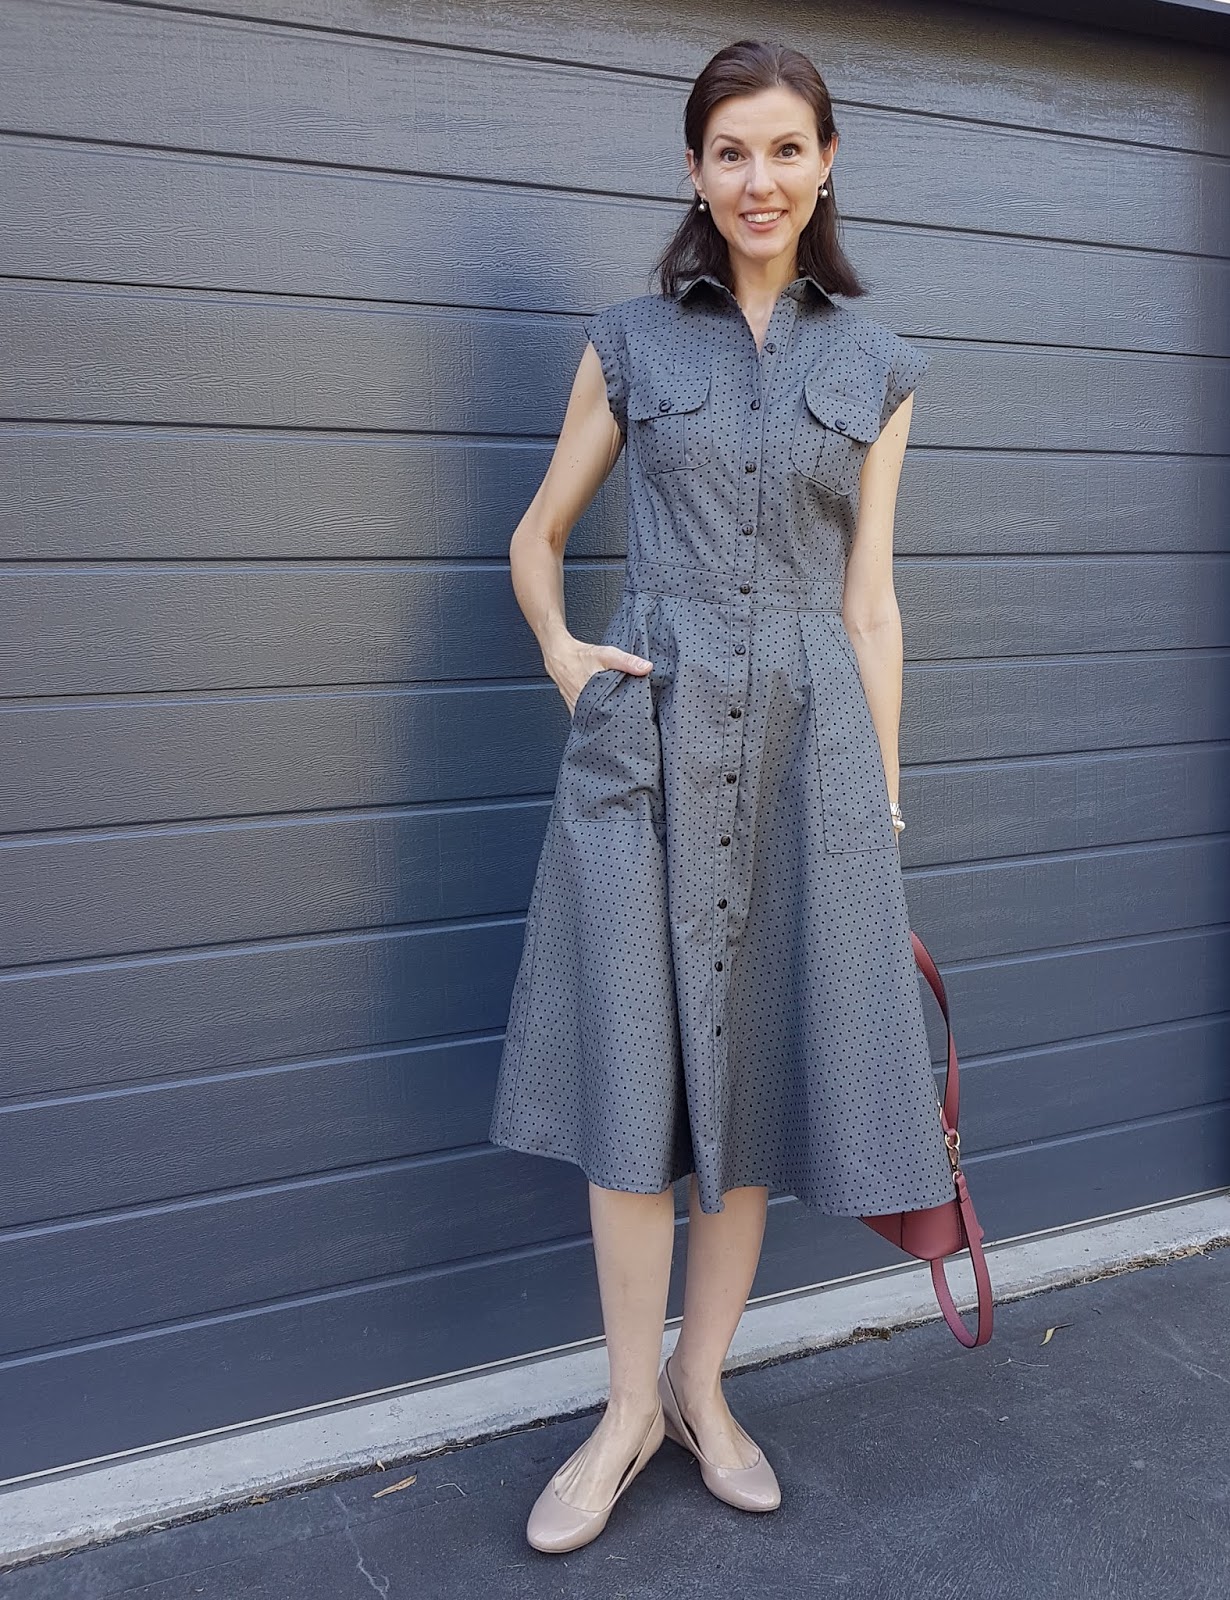
Matilda Shirt Dress by Megan Neilsen

Hello!

It was love at first sight with the Matilda Shirt Dress by Megan Neilsen.  I bought it right away, glued together & cut out the pdf (yes, I prefer glue to tape. It's a controversial divide in the pdf pattern community!!!) and then it sat in my sewing room.  I even had the perfect fabric for it in my stash!

At the time I was using a vintage machine, which meant manual buttonholes.  Try as I might, my buttonholes were always different sizes which made me crazy!!  You can read more about my experience with my new Designer Jade 35 machine over on the Husqvarna Viking Australia blog.

To make this pattern fit me, I added 2.5cm to the bodice length (may do slightly less next time) and 10cm to the skirt length.  I graded between XS & S sizes too.

The dress has a lot of pieces, but the instructions are really clear and easy to follow (I actually followed them!).  I love the fit of the dress which makes me want to try more of Megan Neilsen's patterns!  I like that the waistband and yoke are lined and don't get me started on those great skirt pockets...love!!!

The shape of the skirt is really great too, swishy without being too much of a fabric hog!  I find that the buttons can pull when you sit in straighter shirt dresses, but that doesn't happen with this skirt.  All in all, this is a shirt dress that I'm really happy with!

It is a pattern I'll make again, perhaps I'll try adding sleeves for cooler weather. 


Happy Sewing!
xox Allison

Wednesday, 25 April 2018

Bondi Top with sleeves

I recently lost my sew-jo, so to help get it back I started looking at patterns and then reading blog reviews of those patterns for inspiration.  

Which reminded me that that was why I started blogging in the first place! To contribute to sewing knowledge & inspiration.  I've not been good about that lately, and I'm sorry.  Instagram just makes it SO quick & easy to share makes, but it isn't the detailed resource that a blog post can be. I'm going to try to share more on my blog!

I have more questions on IG about my hacks of The Bondi Top by Sew To Grow than any other pattern (probably because I make it so often!).  It's a very popular pattern because of its inclusive sizing (xs - 4x), simple design lines and it's just a really easy make!  Perfect for a beginner or a fast satisfying make for a more experienced sewist.

I first added 3/4 sleeves to my French Terry version as I didn't want to waste the leftover fabric (I'm thrifty!) & also because it made sense to have sleeves for this thicker fabric. I simply hacked the sleeves by making a rectangle that was the same width as the sleeve opening, then tapering it slightly to the opening.  I added a cuff for a bit of fun!

The great news is that Lindsey, the designer of Sew To Grow patterns has now created a sleeve extension pack you can buy for your Bondi Top.  So you're spared my dodgy hand drawn instructions!!  Also, her version fits perfectly whereas my hack was a bit of trial & error! As hacks tend to be!


I also hacked the stripped top into a tunic length to wear over leggings.  How much length you add is dependent on your height.  Obviously, I (at 183cm) add a lot more length that someone who is 153cm!


My red gingham version was again hacked to have sleeves, but this time I cropped it slightly.  The original pattern has a curved hem that is lower in the back (great butt coverage) but I raised the back hem to match the front.

The Bondi Top is one of those great staples that can be hacked so many ways!  I've made it into a dress, added pockets and made it in knits and wovens.

The extension pack you can buy gives you instructions for adding a casing for a waistband, or you can just add some elastic to the waistline (my dodgy hack).


Next up I'm planning a chambray version with sleeves & waistband casing which I can layer for winter or wear alone in the warmer months.  Hmmm...I may also add some patch pockets because pockets make everything better!!

If you have any questions on my Bondi Top  hacks or hack suggestions of your own, let me know!

Over on the Husqvarna Viking Australia blog you can see my Bondi Top which I added embroidery to.  I love this version & plan on adding embroidery to more!

Happy Sewing!

Friday, 6 April 2018

Library Bag with Monogram

One of my favourite things to do with my girls in the school holidays is to make frequent trips to the library.  This year I decided to make them each a special library bag (so I'm not lugging all the books!).  To be honest, I am SO thrilled that I can now do embroidery (monogram EVERYTHING!) with the Designer Jade 35 that I am looking for things to embroider! 
The construction of the bag is really simple.  This bag is based on the larger sized picture books my girls like to borrow from the library, but you can size yours to meet your needs!

Head over to Husqvarna Viking Australia's blog to get the details on how to make this bag!

Because I am SO in love with the embroidery features of the Designer Jade 35 I added a personalized embroidery for each of my daughters. 

We had so much fun sitting at the computer together, looking at all the designs and fonts they could choose from (free software that comes with the Designer Jade 35).  You simply save your design to the included USB and then plug it into the machine (SO easy!).

Being girly girls they both wanted heart designs!  They then selected their own thread colours for the embroidery. 

I really love involving my girls in the creative process and it makes them love what I make even more because they have contributed.  I wish I had filmed the excitement of them watching the Designer Jade 35 create their selected embroidery & the shrieks of delight as "their" design came together (seriously, who needs TV?!!) 

A little tip for my fellow newbies to machine embroidery: embroider the bag before you sew it together!  You may roll your eyes and give me a big "well duh!"...but hey, I'm just learning!  And having SO much fun in the process!

Happy Sewing!
xox Allison

Thursday, 1 February 2018

Adding a side seam pocket & my first sew with the Designer Jade 35 by Husqvarna Viking

Hello!

I am so excited to be a guest blogger over at Husqvarna Viking Australia!

With all the amazing embroidery and other capabilities of the Designer Jade 35, the first thing I do is an alteration (I guess that's just me!!).  But in my defence, it is my favourite skirt!!  You can read about how I added a nice big (holds your phone!!) side seam pocket over at Husqvarna Viking. 


For my first sewing experience with the Designer Jade 35 I am absolutely thrilled with how it sews and its great built in features.  You can read about the awesome overcast stitch this machine does (because my cranky old overlocker is stubbornly refusing to work...it is NOT a Husqvarna Viking machine!) in my post here.  I can't forget to mention the perfect "fix" stitch it does at the start and end of your seam or the automatic thread cutter! 

I have previously sewn on a vintage machine which had none of these features, so they are all just so amazing to me and make for an even more enjoyable sewing experience!

If you follow me on IG you will know I have been playing with the machine embroidery features a LOT!  My next post will feature my first adventures into machine embroidery.  Those of you who are experienced with machine embroidery will probably roll your eyes and shake your head...but I am just learning and having SO MUCH FUN in the process!

Happy Sewing!
xox Allison


Friday, 26 January 2018

If at first you don't succeed...

As a sewing blogger, or as a sewist in general, we love to show off the makes we are proud of.  The pieces where we have done our best work.
 
But the reality of sewing is that not everything works out. Sometimes it simply does not work out, or you are not happy with it.
 
Do you have an area of sewing that is currently just beyond your reach?
For me it is bag making.
 
I can make a lovely tote bag until the cows come home. However, when I attempt a handbag it just doesn't work out. My first attempt was so bad I didn't even photograph it! The fact that I tried to self draft it based on an existing bag probably had a LOT to do with the fail!
 
My next attempt was better (top right photo below). I used a free pattern by Blue Calla (see here). However, I didn't have any hardware on hand so just didn't use any. This resulted in a really "homemade" looking bag, but not in a good way. I used this bag for a little while, but don't love it.
 
I have just finished another bag (bottom right photo below), also a free pattern by Blue Calla (see here). I used hardware salvaged from a worn out bag. Yes, it is better than the last one but I'm still not thrilled with it. I used suede scraps & leftover fabric from my previous bag making attempt. The pattern is great, it's my execution I'm not happy with.
 
My garment sewing has precision & is as nice on the inside as it is outside. Why is my bag making a hot mess??? Argh! It's frustrating!
 
Currently, I have so little confidence in my skill that I refuse to buy a pattern. Why spend money on something I'm going to mess up?? But this defeatist attitude is not going to get me anywhere!
 
I'm considering trying the Necessary Clutch Wallet by Emmaline Bags.  I've seen so many beautiful versions on insta, I especially love those made in cork fabric. Or the Magnolia Mini Messenger by Blue Calla, also a chance to experiment with cork fabric!
 
I certainly do NOT need another bag or wallet. I just want to conquer this aspect of sewing that seems to ellude me!
 
Of course, I should stop comparing my attempts to the high quality professional leather bags I have. Lets be honest, I have neither the skill or equipment to come close to my Carbotti or Coach handbags!
 
Big sigh...I will just keep ploding along and hope for something functional that isn't a hot mess!
 
Is there an area of sewing that you want to improve in? Or perhaps you want to start sewing, but think you will mess it up (contact me, I can recommend fool proof patterns for beginners!)
 
Happy Sewing! Wish me luck!!

Xox Allison
On the left is how I want my bags to look, on the right are what I have so far.
Granted, I have neither the tools or skill to make a Chanel bag...

Saturday, 23 December 2017

A New Era in Sewing

2018 is going to be an exciting new era in my sewing adventure and I am SO excited!

I have partnered with Husqvarna Viking® and will be creating with the amazing Husqvarna Viking Designer Jade 35® sewing machine (check it out here).  As someone who has always used a vintage sewing machine, this is a whole new and exciting world of sewing! There is so much to learn with this machine, and I've only had it for a day, but it is SO easy to use.  Seriously, the buttons just make sense!   

I could rave endlessly about the features of this machine, but you can read about them for yourself on the Husqvarna Viking website 


Image from Husqvarna Viking
We all know my sewing space isn't this cool!


Naturally, the first thing I did with the machine (after a couple of straight lines of sewing...it does the most perfect "fix" stitch at the start and end AND cuts the threads with the touch of a button!!!) was stitch out my name.  I cannot stress how easy it was to program in my name and then just press the start button!   Done!

I'm not the only one who would do this, right?!

The Designer Jade 35 also does embroidery.  I've not yet explored that feature, but if the ease of the sewing machine is anything to go by it will be a breeze to use.  My mind is racing with all the dressmaking projects I can add embroidery to...the possibilities are endless.  And clothing with embroidery is so on trend right now that I'm feeling very cool!

So stay tuned for lots of exciting new projects and sewing inspiration!

Check out Husqvarna Viking Sewing Australia's Facebook page for the announcement and a giveaway (closing early Jan 2018).

Happy Sewing!

xox Allison

Monday, 22 May 2017

How To Make a Reversible Dress

I have had lots of questions about the reversible dress I made for the #sewtallandcreative2017 challenge.

To make a dress reversible it needs to have no zippers or buttons.  For this dress I used the Sweet Summertime dress by Sew To Grow as it is a straight forward design with no closures.  I did make some modifications which you can read about here.

In fact, many of the Sew To Grow patterns would work as reversible garments as they are simple designs with no zippers or buttons etc.  I am now thinking that I need to make a Bondi Top or Noosa Shift Dress reversible!

Basically, to make a reversible dress (I'm using a dress as my example, but the same steps would apply to a top or skirt or loose pants)  you make 2 dresses in different fabrics. 

Here, you can see that I've got one dress made in a sheer silk, the other in a satin.  Using a sheer fabric is more challenging, particularly because you need to have really neat seam finishes.  In this dress I used French Seams so everything would be tidy.

To show off the underneath layer I put a split in the front of the silk layer.


Place the 2 dresses with wrong sides together. 

Finish the neckline and sleeves with bias.  If making a skirt or pants, you would use the waistband to sandwich the 2 layers together.
As you can see here, I made bias binding out the same fabric as the satin side of my dress.  Use the bias to sandwich the 2 pieces together. 


In this dress the 2 sides are only attached at the sleeves and neckline. 

When hemming the dress, make sure the hems are the same length for a tidy finish. 


It's just that simple to make a reversible dress (or any other garment!).  If you make yourself a reversible piece please send me a pic or tag me on Instagram (@the_tall_mama) because I'd love to see it!

Happy Sewing! xox

Saturday, 20 May 2017

The Big Reveal! #SewTallandCreative2017


Here it is!  My dress entry for the #SewTallandCreative2017 competition hosted by MARGE Clothing and Tall Guides.

Before we talk about the dress, I'd just like to say that I truly feel honoured to be selected to take part.  Yes, that sounds a bit like an Academy Awards speech, except that I really mean it.  Being part of this challenge tested my design and sewing skills.  It encouraged me to work with fabrics I wasn't as comfortable sewing and to make and design a dress which made the most of the quantity of fabric provided.  Although I had periods of indecision, worry and second guessing myself on the whole I loved the entire experience.  More importantly I LOVE my dress!  I love the weight of the fabrics, I love the way it swishes when I walk (you can't help but add a little swagger!!) and I love how I feel wearing it.  And isn't that what Tall Guides and MARGE is all about?  Feeling confident and beautiful in our tall bodies?!

So without further ado, here is my dress!  The challenge required we use 2 fabrics generously gifted by MARGE.  All MARGE fabrics are ethically made in Europe & USA.  To make the most of the divine fabrics I made my dress reversible.  Two dresses in one!  The dress pulls on over my head and doesn't have a zip or buttons.  I based my design on the Sweet Summertime Dress by Sew To Grow.  I've made this dress before, so knew the bodice fit.  I did modify the skirt of the dress by making it fuller and longer and making the front pleats bigger.  I added pleats to the back of the skirt for extra fullness & swish.  I made the hem of the skirt longer in the back so you could see the underneath fabric better, this also gives more swish when you walk.  With the gorgeous drape of these fabrics, I was all about the swish factor!   


I love the how you can see the silk layer underneath as the dress moves!
Please ignore the patch on my arm; it's for pain medication.

As I move the silk shows at the hem which adds such a pretty detail.

The weight of these fabrics make the dress SO swishy!
 
Just look at the movement in that skirt & the way the satin shines!

Swish!


Due to fabric restrictions I had to put a seam in the back of the silk layer,
but the movement wasn't effected.

Just look at that movement!
 
I'm so pleased I opened the front of the silk layer to show the gorgeous satin underneath.

I added a little tie belt to tie in (pun only a little bit intended)
the satin trim around the neck & sleeves.

I love the way this dress hangs and feels!


So there it is!  My entry for #SewTallandCreative2017 
I'm very proud of it!

Please check out the other fabulous ladies: 
Beth at www.sewdiy.com
Janet at www.diywardrobe.co.uk
Tiffany at www.prettytallsewnsew.com

Thank you for following my progress in this challenge!  xox Allison

Tuesday, 9 May 2017

#SewTallAndCreative2017 Sewing Process

This challenge is really speeding along!

I am about half way into making my dress for #SewTallAndCreative2017 hosted by MARGE and Tall Guides. 

I am making my dress out of the gorgeous dotty silk over the peach satin.  In my last post I was still tossing around design ideas but I really love the 2 fabrics together.  My design is still changing and evolving as I sew, which is such a fun part of the creative process. 

Typically I would advise someone to make a muslin of their design (a mock up in cheap fabric), which I haven't done in this case.  We don't always follow our own good advice, do we?!  However, by working with the fabrics as I go I feel a little more free to make changes based on how they hang on my body.

Thus far, I have used French Seams in the satin to give a beautiful finish.  For those who don't sew (yet!) they are essentially seams which double over on themselves. They're twice as much work but well worth it! I am finding sewing the silk (dotty fabric) a massive challenge. Working with this fabric is far out of my comfort zone and really testing my sewing skills. It's great that this competition is really stretching both my creativity and skill, I just hope it doesn't turn out to be a hot mess!

The bodice of my dress is very simple.  It's based on a pattern I've used a couple of times before (see here) so I know I don't need to make major changes as I don't have a large bust or very long torso...all my extra length is from the waist down!

For the skirt of my dress I've gone with as much fullness as the fabric I had on hand would allow.  I'm still tossing around ideas of how I'll really show off the beautiful satin underneath the silk layer.  I am not usually an indecisive person AT ALL but there are just so many options I'm not sure which is the best to go with!

The final reveal of my dress will be 20th May, so stay tuned!

Check out the progress of the other fabulous ladies who are participating:

Beth at www.sewdiy.com
Janet at www.diywardrobe.co.uk
Tiffany at www.prettytallsewnsew.com

Happy sewing & wish me luck!
 
The silk is just gorgeous over the peach satin. 
I'm being careful & using lots of pins, something I rarely do!
These strips will be ironed into bias binding, which may be used around the neckline.
 
 
Talk about cutting it close!!  I had only a tiny handful of scraps left after cutting the silk. 
There is NO room for error here people!!

Sunday, 30 April 2017

#SewTallAndCreative2017 Concept/Initial Design Process

After so much back and forth it was getting ridiculous, I have selected 2 fabrics.  The peach satin & the sheer pink silk. 

My design process changes as I sew, as things do or do not work out as I see them in my head.  My design is a work in progress!  On IG I said I would spare you anymore of my stick figures...but as that is the extent of my design drawing ability, here's another on! (Forgive me!!!). 

I will post updates on IG as the construction gets underway and I either continue with this style or modify it.  Or worst case, have to go with plan B which uses the divine printed lace with the peach fabric (which I'll no doubt end up making anyway, because the fabric is too beautiful to sit on the shelf!).

Happy Sewing! 


I hope there's a prize for design drawings, because this is clearly a winner!!! 

Wednesday, 29 March 2017

#SewTallAndCreative2017 Inspiration & Intention


I find inspiration in many places; from RTW (ready to wear) clothing I see online & in stores, from the fabulous & fashionable I follow on IG (I'm sure that includes you!) to the gorgeous vintage patterns that I hoard collect, my favourites being the 1950's & 60's.

Inspiration can also come from gorgeous fabrics.  You can look at and fondle (I know that sounds a bit creepy but anyone who sews gets it!) fabric and envisage the garment it could become.

When I received the box of gorgeous fabrics from MARGE my mind went into overdrive.  My original thoughts for a design went out the window as they didn't lend themselves to the soft drapey goodness of these fabrics.  Also, part of the challenge is to use 2 different fabrics which adds another creative element to my typically basic style. 

Although I've not yet settled on a design, I know I will stick to elements that are consistent with my personal style and flatter my shape, such as a full or A line skirt at or below the knee, defined waist and fitted bodice.  That leaves things pretty wide open, doesn't it?!  Yep...hence my challenge! 

Here are a few style ideas I have been bouncing around (images from Google Images):

Love the lace sleeves here!

Love the sleeves & skirt fullness!

Love the sheer top and defined waist!

This dress just looks like it would
swish when you walk!
 
Love, love, love! Just need to
figure out how to make it!

Hmmm...there is a pretty common theme there!! 

I will update you with my design ideas when I figure out how to best incorporate 2 gorgeous fabrics. 

Please feel free to make any suggestions, all helpful ideas welcome!

Monday, 20 March 2017

MARGE / Tall Guides Design Challenge #SewTallAndCreative2017


I am equal parts excited and terrified to be participating in the MARGE and Tall Guides design challenge.

The challenge is to make a Spring / Summer dress using 2 fabrics generously gifted by MARGE clothing.  Having been the lucky beneficiary of MARGE fabrics before, I knew I couldn't resist the opportunity to sew with their stunning ethically made fabrics.  Who could?! 

I thought I'd try something a little different and introduce myself and my super high tech & glam sewing space (otherwise known as my kitchen table & 40 year old sewing machine!) with a little video:

Please check out the other fabulous participants in this challenge.  All of whom I'm trying to put out of my mind because I'm intimidated by their awesomeness!

Beth at www.sewdiy.com
Janet at www.diywardrobe.co.uk
Tiffany at www.prettytallsewnsew.com

I will update you on the challenge as it unfolds, so be sure to check back!  The winner will be announced 20th of May (*big gulp* that's sooner than you think my lovelies!!).

Wish me luck!


Saturday, 19 November 2016

Muslin Magic!

Okay, so "muslin magic" is a bit of an overstatement for the title of this post!!

However, this is a favourite trick of mine when making muslins out of scrap fabric. 

When I'm using a new dress pattern for the first time the fit of the shoulders, bust and waist is most important to me.  Typically I'm making a full / flared skirt so my butt can be as big as it wants to be and the skirt portion will fit!  However, I have to more carefully consider the fit of my upper body (which is sometimes up to 2 sizes smaller than my lower half!). 

Rather than using up lots of fabric to make a muslin of the skirt, which I know will fit, I make just the top.  If the muslin works out I have a lovely new top to wear with jeans or a skirt.  If it doesn't work out, I haven't wasted many metres of fabric.

Here are 2 examples of my top half muslin making magic!

The first is The Rosie Dress by Cotton & Chalk.  I used a rayon purchased from my Church fĂȘte, sadly there wasn't enough to make a whole dress.  I was between sizes so went with the larger size.  Mistake!  It was huge, so huge that I think I lost some of the original shape taking it in.  The neckline is designed for a more endowed woman than I, so I had to take that in too.  All in all, if the fabric wasn't so pretty I'd probably discard this one.  I really don't see myself making the dress, which is a shame because I've seen fabulous versions of it on Instagram.  Who knows, maybe I will give it another go...


No idea what I'm doing here.  Clearly, I'm a professional model!

Pretty fabric!

The second top is The Olivia Dress also by Cotton & Chalk.  I was much happier with this one and have since made it into a long sleeved maxi dress.  For this muslin I used a cotton lawn which was gifted to me.  I didn't have to make any tall girl alterations for this one!


The shot everyone who sews can relate too
 - tucking in a loose thread!

Tuesday, 16 August 2016

Pattern Review: Meridan Knit Dress, by Sew To Grow

The very lovely Lindsey of Sew To Grow asked me to pattern test one of her latest creations, the Meridan Knit Dress.


Now, I don't have the best history with knit fabric. It scares me and doesn't behave itself.  I have only made 2 successful pieces with knits (see here and here)... not a great track record!  However, I decided to face my fear and give this pattern a try.  This is the ONLY knit dress I have made that did not result in cold sweats and a volley of profanity, I consider that a huge win!

The dress has 2 neckline options, 3 sleeve options and 2 hem line options... oh happy days!

I made a round neck (I did raise it about 2 cm) with short sleeves and a straight hem.  I added 3 cm length to the bodice (will add a little less next time) and about 5 cm to the hem.

This dress came together easily and quickly.  The all in one facing means you get a beautiful neckline without having to stress yourself out over neck binding (I'm possibly the only one stressed out by neck binding).

This is a great dress for beginners, and for those more experienced it's one of those easy patterns you can make up quickly and know you're going to get a great result.

I love this dress, oh and it has pockets!!!  I will be making more.  I almost feel like I can sew with knits now... almost...I think I need to make a few more first!